Ignite Java 客户端最佳实践#

背景#

本文总结了在使用Apache Ignite(Ignite2.0)的Java客户端时,需要注意的一些问题,以及一些最佳实践。值得一提的是 Ignite的Java客户端有一些跟直觉上不太一样的地方,需要注意下。

客户端相关#

Ignite客户端有两处跟直觉上相差较大:

  • Ignite客户端连接没有默认超时时间,如果连接不上,有概率会导致创建客户端一直阻塞,所以一定要设置timeout参数
  • Ignite客户端默认不会重连,更不用说无限重连了。并且Ignite客户端重连的实现方式是预先计算出所有重连的时间戳,然后在这些时间戳到达时重连,由于要预先计算出重连的时间戳存入数组,这也就意味着不能无限重连。如果您的应用程序需要无限重连(在云原生环境下,这是非常常见的场景),那么您需要自己实现重连逻辑。

ClientConfiguration里的重要参数

ClientConfiguration timeout#

控制连接超时的参数,单位是毫秒。必须设置!如果不设置,有概率会导致创建客户端一直阻塞。

SQL相关#

SQL查询典型用法

1
2
3
SqlFieldsQuery query = new SqlFieldsQuery("SELECT 42").setTimeout(5, TimeUnit.SECONDS);
FieldsQueryCursor<List<?>> cursor = igniteClient.query(query))
List<List<?>> result = cursor.getAll();

注意:Ignite query出来的cursor如果自己通过iterator遍历则必须要close,否则会导致内存泄漏。

Query相关参数

SqlFieldsQuery timeout#

SqlQuery的超时时间,必须设置。默认是0,表示永不超时。如果不设置,有概率会导致查询一直阻塞。

Web后端项目结构组织#

要点:

  • 使用modelservice,而不是modlesservices。差别不大,节约一个字母,更加简洁。
  • 如果是企业内部的微服务,基本不会、极少把部分的功能以library的形式开放出去,internal目录在这个时候就略显鸡肋,可以省略。

备注:

  • xxx、yyy代表大块的业务区分:如用户、订单、支付
  • aaa、bbb代表小块的业务区分:如(用户的)登录、注册、查询

方案一:多业务模块通过文件名区分,不分子包#

适用于小型项目

注:handler、model、service要留意方法、结构体、接口的命名,避免冲突

1
2
3
4
5
6
7
8
9
10
11
12
13
14
15
16
17
18
19
20
21
22
23
24
25
26
27
example/
|-- cmd/
| |-- example-server/
| |-- example-server.go (start gin app, manage handler, middleware)
|-- pkg/
| |-- handler/
| |-- aaa_handler.go
| |-- bbb_handler.go
| |-- middleware/
| |-- aaa_middleware.go
| |-- bbb_middleware.go
| |-- model/
| |-- aaa_model.go
| |-- bbb_model.go
| |-- service/
| |-- aaa_service.go
| |-- bbb_service.go
| |-- ignite/
| |-- ignite.go
| |-- ignite_test.go
| |-- influx/
| |-- influx.go
| |-- influx_test.go
|-- docker-build/
| |-- scripts/
| |-- start.sh
|-- Dockerfile

方案二:多业务模块通过包名区分,但不拆分model和service#

方案二更适用于由多个小模块组合而成的项目,每个小模块不会太大,复用度较高。

1
2
3
4
5
6
7
8
9
10
11
12
13
14
15
16
17
18
19
20
21
22
23
24
25
26
27
28
29
30
31
32
33
example/
|-- cmd/
| |-- example-server/
| |-- example-server.go (start gin app, manage handler, middleware)
|-- pkg/
| |-- handler/
| |-- xxx/
| |-- xxx_aaa_handler.go
| |-- xxx_bbb_handler.go
| |-- yyy/
| |-- yyy_aaa_handler.go
| |-- yyy_bbb_handler.go
| |-- middleware/
| |-- xxx/
| |-- xxx_aaa_middleware.go
| |-- yyy/
| |-- yyy_bbb_middleware.go
| |-- xxx/
| |-- xxx_aaa_model.go
| |-- xxx_aaa_service.go
| |-- yyy/
| |-- yyy_bbb_model.go
| |-- yyy_bbb_service.go
| |-- ignite/
| |-- ignite.go
| |-- ignite_test.go
| |-- influx/
| |-- influx.go
| |-- influx_test.go
|-- docker-build/
| |-- scripts/
| |-- start.sh
|-- Dockerfile

方案三:多业务模块通过包名区分,并在下层拆分model和service#

方案三更适用于由多个大模块组合而成的项目,每个大模块都很大,复用度较低,较少的互相调用。

方案三在service依赖多个service的情况下,会发生命名冲突。

1
2
3
4
5
6
7
8
9
10
11
12
13
14
15
16
17
18
19
20
21
22
23
24
25
26
27
28
29
30
31
32
33
34
35
example/
|-- cmd/
| |-- example-server/
| |-- example-server.go (start gin app, manage handler, middleware)
|-- pkg/
| |-- handler/
| |-- xxx/
| |-- xxx_aaa_handler.go
| |-- yyy/
| |-- yyy_bbb_handler.go
| |-- middleware/
| |-- xxx/
| |-- xxx_aaa_middleware.go
| |-- yyy/
| |-- yyy_bbb_middleware.go
| |-- xxx/
| |-- model/
| |-- xxx_aaa_model.go
| |-- service/
| |-- xxx_aaa_service.go
| |-- yyy/
| |-- model/
| |-- yyy_bbb_model.go
| |-- service/
| |-- yyy_bbb_service.go
| |-- ignite/
| |-- ignite.go
| |-- ignite_test.go
| |-- influx/
| |-- influx.go
| |-- influx_test.go
|-- docker-build/
| |-- scripts/
| |-- start.sh
|-- Dockerfile

简单的library#

对于简单的library来说,我更推荐将所有的文件都放在同一个package下面,如简单的client封装

1
2
3
4
5
package:com.xxx.yyy/
|-- XxClient
|-- XxDTO
|-- XxException
|-- XxUtil

复杂的SpringBoot项目,负责多个业务模块#

备注:

  • xxx、yyy代表大块的业务区分:如用户、订单、支付
  • aaa、bbb代表小块的业务区分:如(用户的)登录、注册、查询

方案一:多业务模块通过子包来区分,不分子module#

module视图:

1
2
3
4
5
6
7
example(maven artifactId: example-parent)/
|-- example-service(业务逻辑)
|-- example-spring-ignite(依赖spring,常见为中间件client,适配spring模块用于方便单元测试)
|-- example-spring-ignite-test(依赖spring,不依赖test-common,spring模块单元测试用)
|-- example-starter(启动类)
|-- example-test-common(不依赖example-common)
|-- example-util(不依赖Spring框架,可选模块,为service与其他spring集成组件共用)

依赖关系图:

graph TD
service[example-service]
springIgnite[example-spring-ignite]
springIgniteTest[example-spring-ignite-test]
starter[example-starter]
testCommon[example-test-common]
util[example-util]

starter --> service

service --> springIgnite
service --> util
service -.-> testCommon

testCommon --> springIgniteTest

springIgniteTest --> springIgnite

springIgnite --> util

service包内视图:

1
2
3
4
5
6
7
8
9
10
11
12
13
14
15
io.shoothzj.example/
|-- service/
| |-- common/
| |-- module/
| | |-- aaaModule
| | |-- bbbModule
| |-- mapper/
| | |-- aaaMapper
| | |-- bbbMapper
| |-- repo/
| | |-- aaaRepo
| | |-- bbbRepo
| |-- service/
| | |-- aaaService
| | |-- bbbService

方案二:根据业务模块拆分子module#

适用于大型项目,每个业务模块都比较大。

module视图:

1
2
3
4
5
6
7
8
9
10
11
example(maven artifactId: example-parent)/
|-- example-common(可依赖spring模块)
|-- example-rest-xxx(xxx功能模块的rest接口)
|-- example-rest-yyy(yyy功能模块的rest接口)
|-- example-service-xxx(xxx功能的业务逻辑)
|-- example-service-yyy(yyy功能的业务逻辑)
|-- example-spring-ignite(依赖spring,常见为中间件client,适配spring模块用于方便单元测试)
|-- example-spring-ignite-test(依赖spring,不依赖test-common,spring模块单元测试用)
|-- example-starter(启动类)
|-- example-test-common(不依赖example-common)
|-- example-util(不依赖example-common,可选模块,为service、common与其他spring集成组件共用)

依赖关系图:

graph TD
common[example-common]
rest-xxx[example-rest-xxx]
rest-yyy[example-rest-yyy]
service-xxx[example-service-xxx]
service-yyy[example-service-yyy]
springIgnite[example-spring-ignite]
springIgniteTest[example-spring-ignite-test]
starter[example-starter]
testCommon[example-test-common]
util[example-util]

starter --> rest-xxx
starter --> rest-yyy

rest-xxx --> common
rest-xxx --> service-xxx

rest-yyy --> common
rest-yyy --> service-yyy

service-xxx --> common
service-xxx --> springIgnite

service-yyy --> common
service-yyy --> util

common -.-> testCommon

testCommon --> springIgniteTest

springIgniteTest --> springIgnite

springIgnite --> util

关于service模块引不引用rest模块的DTO,我的想法:

如果确实service模块和rest模块DTO差距比较大,可以拆分做转换,如果差距很小/没有差距,可以复用同一个DTO,放在service模块或者更底层的依赖。

service-xxx包内视图:

1
2
3
4
5
6
7
8
9
10
11
12
13
14
15
io.shoothzj.example.service/
|-- xxx/
| |-- common/
| |-- module/
| | |-- aaaModule
| | |-- bbbModule
| |-- mapper/
| | |-- aaaMapper
| | |-- bbbMapper
| |-- repo/
| | |-- aaaRepo
| | |-- bbbRepo
| |-- service/
| | |-- aaaService
| | |-- bbbService

背景#

你可能会在一些场景下碰到需要返回多个不同类型的方法。比如协议解析读取报文时,更具体地像kubernetes在开始解析Yaml的时候,怎么知道这个类型是属于Deployment还是Service?

C#

C语言通常通过使用Struct(结构体)和Union(联合体)的方式来实现这个功能,如下文例子

1
2
3
4
5
6
7
8
9
10
11
12
13
14
15
16
17
18
19
20
21
22
23
24
25
26
27
28
29
30
31
32
33
34
35
36
37
38
39
40
41
42
43
44
45
46
47
48
49
50
51
52
53
54
55
56
57
58
#include <stdio.h>
#include <stdlib.h>
#include <string.h>

typedef enum {
MONKEY,
COW,
UNKNOWN
} AnimalType;

typedef struct {
char* description;
} Monkey;

typedef struct {
char* description;
} Cow;

typedef struct {
AnimalType type;
union {
Monkey monkey;
Cow cow;
};
} Animal;

Animal createAnimal(const char* animalType) {
Animal animal;
if (strcmp(animalType, "Monkey") == 0) {
animal.type = MONKEY;
animal.monkey.description = "I am a monkey!";
} else if (strcmp(animalType, "Cow") == 0) {
animal.type = COW;
animal.cow.description = "I am a cow!";
} else {
animal.type = UNKNOWN;
}
return animal;
}

int main() {
Animal animal1 = createAnimal("Monkey");
if (animal1.type == MONKEY) {
printf("%s\n", animal1.monkey.description);
}

Animal animal2 = createAnimal("Cow");
if (animal2.type == COW) {
printf("%s\n", animal2.cow.description);
}

Animal animal3 = createAnimal("Dog");
if (animal3.type == UNKNOWN) {
printf("Unknown animal type\n");
}

return 0;
}

C++#

在C++中,我们可以使用基类指针来指向派生类的对象。可以使用动态类型识别(RTTI)来在运行时确定对象的类型

1
2
3
4
5
6
7
8
9
10
11
12
13
14
15
16
17
18
19
20
21
22
23
24
25
26
27
28
29
30
31
32
33
34
35
36
37
38
39
40
41
42
43
44
45
46
47
48
49
50
51
52
53
54
#include <iostream>
#include <stdexcept>

class Animal {
public:
virtual std::string toString() const = 0;
};

class Monkey : public Animal {
public:
std::string toString() const override {
return "I am a monkey!";
}
};

class Cow : public Animal {
public:
std::string toString() const override {
return "I am a cow!";
}
};

Animal* createAnimal(const std::string& animalType) {
if (animalType == "Monkey") {
return new Monkey();
}
if (animalType == "Cow") {
return new Cow();
}
throw std::runtime_error("Unknown animal type: " + animalType);
}

int main() {
try {
Animal* animal1 = createAnimal("Monkey");

if (Monkey* monkey = dynamic_cast<Monkey*>(animal1)) {
std::cout << monkey->toString() << std::endl;
}
delete animal1;

Animal* animal2 = createAnimal("Cow");

if (Cow* cow = dynamic_cast<Cow*>(animal2)) {
std::cout << cow->toString() << std::endl;
}
delete animal2;
}
catch (const std::runtime_error& e) {
std::cerr << e.what() << std::endl;
}

return 0;
}

Go#

Go的常见处理方式,是返回一个接口或者**interface{}**类型。调用者使用Go语言类型断言来检查具体的类型

1
2
3
4
5
6
7
8
9
10
11
12
13
14
15
16
17
18
19
20
21
22
23
24
25
26
27
28
29
30
31
32
33
34
35
36
37
38
39
40
41
42
43
44
45
46
47
48
49
50
51
52
53
54
package main

import (
"fmt"
)

type Animal interface {
String() string
}

type Monkey struct{}

func (m Monkey) String() string {
return "I am a monkey!"
}

type Cow struct{}

func (c Cow) String() string {
return "I am a cow!"
}

func createAnimal(typeName string) (Animal, error) {
switch typeName {
case "Monkey":
return Monkey{}, nil
case "Cow":
return Cow{}, nil
default:
return nil, fmt.Errorf("Unknown animal type: %s", typeName)
}
}

func main() {
animal1, err := createAnimal("Monkey")
if err != nil {
fmt.Println(err)
return
}

if monkey, ok := animal1.(Monkey); ok {
fmt.Println(monkey)
}

animal2, err := createAnimal("Cow")
if err != nil {
fmt.Println(err)
return
}

if cow, ok := animal2.(Cow); ok {
fmt.Println(cow)
}
}

Java#

Java语言的常见处理方式,是返回Object类型或者一个基础类型。然后由调用方在进行instance of判断。或者Java17之后,可以使用模式匹配的方式来简化转型

1
2
3
4
5
6
7
8
9
10
11
12
13
14
15
16
17
18
19
20
21
22
23
24
25
26
27
28
29
30
31
32
33
34
35
36
37
38
39
40
41
42
43
44
45
46
47
48
49
50
public class MultiTypeReturnExample {
static class Monkey {
@Override
public String toString() {
return "I am a monkey!";
}
}

static class Cow {
@Override
public String toString() {
return "I am a cow!";
}
}

public static Object createAnimal(String type) throws IllegalArgumentException {
switch (type) {
case "Monkey":
return new Monkey();
case "Cow":
return new Cow();
default:
throw new IllegalArgumentException("Unknown animal type: " + type);
}
}

public static void main(String[] args) throws Exception {
Object animal1 = createAnimal("Monkey");

// java8 写法,后面如果明确用做精确的类型,需要强制转换

if (animal1 instanceof Monkey) {
System.out.println(animal1);
}

Object animal2 = createAnimal("Cow");
if (animal2 instanceof Cow) {
System.out.println(animal2);
}

// java17 写法,不需要强制转换
if (createAnimal("Monkey") instanceof Monkey animal3) {
System.out.println(animal3);
}

if (createAnimal("Cow") instanceof Cow animal4) {
System.out.println(animal4);
}
}
}

Javascript#

动态类型语言,使用instanceof运算符判断

1
2
3
4
5
6
7
8
9
10
11
12
13
14
15
16
17
18
19
20
21
22
23
24
25
26
27
28
29
30
31
32
33
34
35
36
37
38
39
40
41
42
43
44
class Animal {
toString() {
return 'I am an animal';
}
}

class Monkey extends Animal {
toString() {
return 'I am a monkey';
}
}

class Cow extends Animal {
toString() {
return 'I am a cow';
}
}

function createAnimal(animalType) {
switch (animalType) {
case 'Monkey':
return new Monkey();
case 'Cow':
return new Cow();
default:
throw new Error(`Unknown animal type: ${animalType}`);
}
}

try {
const animal1 = createAnimal('Monkey');
if (animal1 instanceof Monkey) {
console.log(animal1.toString());
}

const animal2 = createAnimal('Cow');
if (animal2 instanceof Cow) {
console.log(animal2.toString());
}

const animal3 = createAnimal('Dog');
} catch (error) {
console.error(error.message);
}

Kotlin#

Kotlin可以使用Sealed Class(密封类)和Any类型两种方式。使用Any的场景,与Java返回Object类似。Sealed Class更加安全、更方便一些。

使用Any类型#

1
2
3
4
5
6
7
8
9
10
11
12
13
14
15
16
17
18
19
20
21
22
23
24
25
26
27
28
29
30
31
32
33
34
35
open class Animal

class Monkey: Animal() {
override fun toString(): String {
return "I am a monkey!"
}
}

class Cow: Animal() {
override fun toString(): String {
return "I am a cow!"
}
}

fun createAnimal(type: String): Any {
return when (type) {
"Monkey" -> Monkey()
"Cow" -> Cow()
else -> throw IllegalArgumentException("Unknown animal type: $type")
}
}

fun main() {
val animal1 = createAnimal("Monkey")
when (animal1) {
is Monkey -> println(animal1)
is Cow -> println(animal1)
}

val animal2 = createAnimal("Cow")
when (animal2) {
is Monkey -> println(animal2)
is Cow -> println(animal2)
}
}

使用SealedClass#

1
2
3
4
5
6
7
8
9
10
11
12
13
14
15
16
17
18
19
20
21
22
23
24
25
26
sealed class Animal {
data class Monkey(val info: String = "I am a monkey!") : Animal()
data class Cow(val info: String = "I am a cow!") : Animal()
}

fun createAnimal(type: String): Animal {
return when (type) {
"Monkey" -> Animal.Monkey()
"Cow" -> Animal.Cow()
else -> throw IllegalArgumentException("Unknown animal type: $type")
}
}

fun main() {
val animal1 = createAnimal("Monkey")
when (animal1) {
is Animal.Monkey -> println(animal1.info)
is Animal.Cow -> println(animal1.info)
}

val animal2 = createAnimal("Cow")
when (animal2) {
is Animal.Monkey -> println(animal2.info)
is Animal.Cow -> println(animal2.info)
}
}

Python#

Python是动态类型的语言,可以简单基于一些条件返回不同类型的对象,然后在接收到返回值之后使用type()函数或isinstance()函数来确定其类型

1
2
3
4
5
6
7
8
9
10
11
12
13
14
15
16
17
18
19
20
21
22
23
24
25
26
27
28
29
30
31
class Animal:
def __str__(self):
return "I am an animal"

class Monkey(Animal):
def __str__(self):
return "I am a monkey"

class Cow(Animal):
def __str__(self):
return "I am a cow"

def create_animal(animal_type):
if animal_type == "Monkey":
return Monkey()
elif animal_type == "Cow":
return Cow()
else:
raise ValueError(f"Unknown animal type: {animal_type}")

def main():
animal1 = create_animal("Monkey")
if isinstance(animal1, Monkey):
print(animal1)

animal2 = create_animal("Cow")
if isinstance(animal2, Cow):
print(animal2)

if __name__ == "__main__":
main()

Ruby#

Ruby也较为简单,在方法内部直接返回不同类型的对象。然后,可以使用is_a方法或class方法来确定返回对象的实际类型。

1
2
3
4
5
6
7
8
9
10
11
12
13
14
15
16
17
18
19
20
21
22
23
24
25
26
27
28
29
30
31
32
33
34
35
36
37
38
39
40
class Animal
def to_s
"I am an animal"
end
end

class Monkey < Animal
def to_s
"I am a monkey"
end
end

class Cow < Animal
def to_s
"I am a cow"
end
end

def create_animal(animal_type)
case animal_type
when "Monkey"
Monkey.new
when "Cow"
Cow.new
else
raise "Unknown animal type: #{animal_type}"
end
end

begin
animal1 = create_animal("Monkey")
if animal1.is_a? Monkey
puts animal1
end

animal2 = create_animal("Cow")
if animal2.is_a? Cow
puts animal2
end
end

Rust#

在Rust中,可以使用enum(枚举)来创建一个持有多种不同类型的数据结构。然后使用match语句来做模式匹配。

1
2
3
4
5
6
7
8
9
10
11
12
13
14
15
16
17
18
19
20
21
22
23
24
25
26
27
28
29
30
31
32
33
34
35
36
37
38
39
40
41
42
43
44
45
46
use std::fmt;

enum Animal {
Monkey,
Cow,
}

impl fmt::Display for Animal {
fn fmt(&self, f: &mut fmt::Formatter<'_>) -> fmt::Result {
match self {
Animal::Monkey => write!(f, "I am a monkey!"),
Animal::Cow => write!(f, "I am a cow!"),
}
}
}

fn create_animal(animal_type: &str) -> Result<Animal, String> {
match animal_type {
"Monkey" => Ok(Animal::Monkey),
"Cow" => Ok(Animal::Cow),
_ => Err(format!("Unknown animal type: {}", animal_type)),
}
}

fn main() {
match create_animal("Monkey") {
Ok(animal) => match animal {
Animal::Monkey => println!("{}", animal),
_ => (),
},
Err(e) => println!("{}", e),
}

match create_animal("Cow") {
Ok(animal) => match animal {
Animal::Cow => println!("{}", animal),
_ => (),
},
Err(e) => println!("{}", e),
}

match create_animal("Dog") {
Ok(_) => (),
Err(e) => println!("{}", e),
}
}

Scala#

scala中,可以使用sealed trait和case class来创建一个能够返回多种不同类型的方法。Sealed trait可以定义一个有限的子类集合,可以确保类型安全

1
2
3
4
5
6
7
8
9
10
11
12
13
14
15
16
17
18
19
20
21
22
23
24
25
26
27
28
29
30
31
32
33
34
35
36
37
38
39
sealed trait Animal {
def info: String
}

case class Monkey() extends Animal {
val info: String = "I am a monkey!"
}

case class Cow() extends Animal {
val info: String = "I am a cow!"
}

object MultiTypeReturnExample {
def createAnimal(animalType: String): Animal = {
animalType match {
case "Monkey" => Monkey()
case "Cow" => Cow()
case _ => throw new IllegalArgumentException(s"Unknown animal type: $animalType")
}
}

def main(args: Array[String]): Unit = {
try {
val animal1 = createAnimal("Monkey")
animal1 match {
case Monkey() => println(animal1.info)
case _ =>
}

val animal2 = createAnimal("Cow")
animal2 match {
case Cow() => println(animal2.info)
case _ =>
}
} catch {
case e: IllegalArgumentException => println(e.getMessage)
}
}
}

TypeScript#

总得来说,和javascript区别不大

1
2
3
4
5
6
7
8
9
10
11
12
13
14
15
16
17
18
19
20
21
22
23
24
25
26
27
28
29
30
31
32
33
34
35
36
37
38
39
40
41
42
abstract class Animal {
abstract toString(): string;
}

class Monkey extends Animal {
toString(): string {
return 'I am a monkey';
}
}

class Cow extends Animal {
toString(): string {
return 'I am a cow';
}
}

function createAnimal(animalType: string): Animal {
switch (animalType) {
case 'Monkey':
return new Monkey();
case 'Cow':
return new Cow();
default:
throw new Error(`Unknown animal type: ${animalType}`);
}
}

try {
const animal1 = createAnimal('Monkey');
if (animal1 instanceof Monkey) {
console.log(animal1.toString());
}

const animal2 = createAnimal('Cow');
if (animal2 instanceof Cow) {
console.log(animal2.toString());
}

const animal3 = createAnimal('Dog');
} catch (error) {
console.error(error.message);
}

目录#

  • 模块组织
  • 测试手段
  • 依赖组件

典型Spring单元测试模块组织#

1
2
3
-- xxx-app
-- xxx-util
-- test-common

test-common尽量减少依赖,仅依赖必须的非spring组件。也可以统一将需要使用的resources文件放到test-common中。由test-common统一管理,避免每个模块测试都需要拷贝必须的文件。所需的maven配置如下:

1
2
3
4
5
6
7
8
9
10
11
12
13
14
15
16
17
18
19
20
21
22
23
24
25
26
27
28
29
30
31
32
33
34
35
<build>
<resources>
<resource>
<directory>src/main/resources</directory>
<includes>
<include>**</include>
<include>**/**</include>
</includes>
</resource>
</resources>
<plugins>
<plugin>
<groupId>org.apache.maven.plugins</groupId>
<artifactId>maven-resources-plugin</artifactId>
<version>${maven-resources-plugin.version}</version>
<executions>
<execution>
<id>copy-resources</id>
<phase>process-resources</phase>
<goals>
<goal>copy-resources</goal>
</goals>
<configuration>
<outputDirectory>${project.build.directory}/resources</outputDirectory>
<resources>
<resource>
<directory>src/main/resources</directory>
</resource>
</resources>
</configuration>
</execution>
</executions>
</plugin>
</plugins>
</build>

一些典型的配置文件,比如log4j2配置文件,同时,由于test-common不属于测试代码,可能在某些组织下会有更高的要求(如不能存在敏感信息等),如组织有这样的要求,则这类内容不适合放在test-common里统一复用:

1
2
3
4
5
6
7
8
9
10
11
12
13
<?xml version="1.0" encoding="UTF-8"?>
<Configuration status="info" monitorInterval="10">
<Appenders>
<Console name="Console" target="SYSTEM_OUT">
<PatternLayout pattern='%d{yyyy-MM-dd,HH:mm:ss,SSSXXX}(%C:%L):%4p%X[%t#%T]-->%m%n'/>
</Console>
</Appenders>
<Loggers>
<Root level="INFO">
<AppenderRef ref="Console"/>
</Root>
</Loggers>
</Configuration>

测试手段#

利用RestAssured端到端测试http接口#

添加依赖

1
2
3
4
5
6
<dependency>
<groupId>io.rest-assured</groupId>
<artifactId>rest-assured</artifactId>
<version>5.3.1</version>
<scope>test</scope>
</dependency>

为了在SpringBoot测试中使用 RestAssured, 需要配置端口 webEnvironment = SpringBootTest.WebEnvironment.RANDOM_PORT。如:

1
2
3
4
5
6
7
8
9
10
11
@SpringBootTest(webEnvironment = SpringBootTest.WebEnvironment.RANDOM_PORT)
public class MyRestControllerTest {

@LocalServerPort
int port;

@BeforeEach
public void setUp() {
RestAssured.port = port;
}
}

随后可以使用RestAssured来请求接口

1
RestAssured.given().contentType(ContentType.JSON).body("{}").post("url").then().statusCode(200);

依赖组件#

mariadb#

mariadb可以使用mariadb4j

1
2
3
4
5
6
<dependency>
<groupId>ch.vorburger.mariaDB4j</groupId>
<artifactId>mariaDB4j</artifactId>
<version>3.0.1</version>
<scope>test</scope>
</dependency>

书写Extension并使用

1
2
3
4
5
6
7
8
9
10
11
12
13
14
15
16
17
18
19
20
21
22
23
24
import ch.vorburger.mariadb4j.DB;
import ch.vorburger.mariadb4j.DBConfigurationBuilder;
import org.junit.jupiter.api.extension.AfterAllCallback;
import org.junit.jupiter.api.extension.BeforeAllCallback;
import org.junit.jupiter.api.extension.ExtensionContext;

public class MariaDBExtension implements BeforeAllCallback, AfterAllCallback {

private DB database;

@Override
public void beforeAll(ExtensionContext context) throws Exception {
DBConfigurationBuilder configBuilder = DBConfigurationBuilder.newBuilder();
configBuilder.setPort(3306);
database = DB.newEmbeddedDB(configBuilder.build());
}

@Override
public void afterAll(ExtensionContext context) throws Exception {
if (database != null) {
database.stop();
}
}
}

ignite#

Ignite可以使用现有的junit5集成

1
2
3
4
5
<dependency>
<groupId>io.github.embedded-middleware</groupId>
<artifactId>embedded-ignite-junit5</artifactId>
<version>0.0.3</version>
</dependency>

可以直接使用EmbeddedIgniteExtension,还可以使用EmbeddedIgnitePorts自定义Ignite的关键端口号

Java#

Apache http client#

Wire log#

Apache http client会打印请求和响应的wire log,包含请求和响应的header和body,打印在debug级别。

Apache http client的日志都通过org.apache.http.wire这个logger打印,可以通过配置这个logger来控制wire log的打印。

注:Apache http client默认通过apache common logging来打印日志,可以通过配置

1
2
3
4
5
<dependency>
<groupId>org.slf4j</groupId>
<artifactId>jcl-over-slf4j</artifactId>
<version>1.7.32</version>
</dependency>

来使用slf4j来打印日志。

在本篇文章中,我们将探讨如何在容器内指定特定域名解析结果的几种方式。为了方便演示,首先我们创建一个演示用的Deployment配置文件。

1
2
3
4
5
6
7
8
9
10
11
12
13
14
15
16
17
18
19
20
21
22
23
apiVersion: apps/v1
kind: Deployment
metadata:
name: busybox-deployment
labels:
app: busybox
spec:
replicas: 1
selector:
matchLabels:
app: busybox
template:
metadata:
labels:
app: busybox
spec:
containers:
- name: busybox
image: busybox
args:
- /bin/sh
- -c
- "while true; do echo Hello, Kubernetes!; sleep 10;done"

这个deployment会创建1个busybox的pod,容器每隔10s会打印“Hello, Kubernetes!”到控制台

TL;DR#

方案 修改级别 是否推荐 备注
修改/etc/hosts pod
添加HostAliases记录 pod/deploy/statefulset
修改Coredns配置 整个kubernetes集群
自定义DNS策略 pod/deploy/statefulset 视情况而定 如需对接三方的DNS服务器,推荐采用
使用三方DNS插件 整个kubernetes集群 不推荐,Coredns为业内主流

修改/etc/hosts#

修改/etc/hosts是最传统的方式,直接在容器内修改相应的文件来实现域名解析,在Pod级别生效。由于其可维护性较差(每次pod发生重启都需要手动修改),不推荐在生产环境使用。

例如,我们可以在/etc/hosts里面添加这样一条记录

1
250.250.250.250 four-250
1
2
/ # ping four-250
PING four-250 (250.250.250.250): 56 data bytes

添加HostAliases记录#

HostAliases是kubernetes中Pod配置的一个字段,它提供了Pod内容器的/etc/hosts文件的附加记录。这在某些情况下非常有用,特别是当你想要覆盖某个主机名的解析结果,或者提供网络中没有的主机名解析时。

这个可以在Pod、Replica、Deployment、StatefulSet的级别修改,维护性稍强。举个🌰,我们将上面的yaml修改为

1
2
3
4
5
6
7
8
9
10
11
12
13
14
15
16
17
18
19
20
21
22
23
24
25
26
27
apiVersion: apps/v1
kind: Deployment
metadata:
name: busybox-deployment
labels:
app: busybox
spec:
replicas: 3
selector:
matchLabels:
app: busybox
template:
metadata:
labels:
app: busybox
spec:
hostAliases:
- ip: "250.250.250.250"
hostnames:
- "four-250"
containers:
- name: busybox
image: busybox
args:
- /bin/sh
- -c
- "while true; do echo Hello, Kubernetes!; sleep 10;done"

这个时候我们查看容器的/etc/hosts,发现它被kubernetes自动插入了一条记录Entries add by HostAliases。这就是hostAliases的实现原理

kubelet_pods代码中进行了这样的写入动作

1
2
3
4
5
6
7
8
9
10
11
12
13
14
func hostsEntriesFromHostAliases(hostAliases []v1.HostAlias) []byte {
if len(hostAliases) == 0 {
return []byte{}
}

var buffer bytes.Buffer
buffer.WriteString("\n")
buffer.WriteString("# Entries added by HostAliases.\n")
// for each IP, write all aliases onto single line in hosts file
for _, hostAlias := range hostAliases {
buffer.WriteString(fmt.Sprintf("%s\t%s\n", hostAlias.IP, strings.Join(hostAlias.Hostnames, "\t")))
}
return buffer.Bytes()
}

Coredns配置#

我们可以通过修改ConfigMap来实现让容器解析特定域名的目的。

更改Coredns配置#

我们可以通过以下命令修改Coredns的配置:

1
kubectl edit cm coredns -n kube-system

原有的configmap#

1
2
3
4
5
6
7
8
9
10
11
12
13
14
15
16
17
18
19
20
21
22
23
24
25
26
Corefile: |
.:53 {
log
errors
health {
lameduck 5s
}
ready
kubernetes cluster.local in-addr.arpa ip6.arpa {
pods insecure
fallthrough in-addr.arpa ip6.arpa
ttl 30
}
prometheus :9153
hosts {
192.168.65.2 host.minikube.internal
fallthrough
}
forward . /etc/resolv.conf {
max_concurrent 1000
}
cache 30
loop
reload
loadbalance
}

在hosts里面加上特定的记录

1
250.250.250.250 four-250

如果您没有配置reload插件,则需要重启Coredns才能生效,默认的reload时间是30s,在plugin/reload/setup.go的defaultInterval中定义

自定义DNS策略#

通过修改DNS策略。使得对于单个Pod/Deploy/StatefulSet将特定的域名解析发给特定的服务器来达到效果,如下,可以对pod添加dns的服务器以及search域

1
2
3
4
5
6
7
8
9
10
11
12
13
spec:
dnsConfig:
nameservers:
- 1.2.3.4
searches:
- search.prefix
containers:
- name: busybox
image: busybox
args:
- /bin/sh
- -c
- "while true; do echo Hello, Kubernetes!; sleep 10;done"

使用第三方DNS插件#

不推荐,使用其他的DNS插件,来做一些炫酷的自定义操作。而且目前Coredns也是业内的主流,没有很好的替代

问题背景#

有一个环境的kafka client发送数据有部分超时,拓扑图也非常简单

Untitled

定位历程#

我们先对客户端的环境及JVM情况进行了排查,从JVM所在的虚拟机到kafka server的网络正常,垃圾回收(GC)时间也在预期范围内,没有出现异常。

紧接着,我们把目光转向了kafka 服务器,进行了一些基础的检查,同时也查看了kafka处理请求的超时日志,其中我们关心的metadata和produce请求都没有超时。

问题就此陷入了僵局,虽然也搜到了一些kafka server会对连上来的client反解导致超时的问题( https://github.com/apache/kafka/pull/10059),但通过一些简单的分析,我们确定这并非是问题所在。

同时,我们在环境上也发现一些异常情况,当时觉得不是核心问题/解释不通,没有深入去看

  • 问题JVM线程数较高,已经超过10000,这个线程数量虽然确实较高,但并不会对1个4U的容器产生什么实质性的影响。
  • 负责指标上报的线程CPU较高,大约占用了1/4 ~ 1/2 的CPU核,这个对于4U的容器来看问题也不大

当排查陷入僵局,我们开始考虑其他可能的调查手段。我们尝试抓包来找线索,这里的抓包是SASL鉴权+SSL加密的,非常难读,只能靠长度和响应时间勉强来推断报文的内容。

在这个过程中,我们发现了一个非常重要的线索,客户端竟然发起了超时断链,并且超时的那条消息,实际服务端是有响应回复的。

随后我们将kafka client的trace级别日志打开,这里不禁感叹kafka client日志打的相对较少,发现的确有log.debug(“Disconnecting from node {} due to request timeout.”, nodeId);的日志打印。

与网络相关的流程:

1
2
3
4
5
6
7
8
9
10
11
12
13
14
15
16
17
18
19
20
21
22
23
24
25
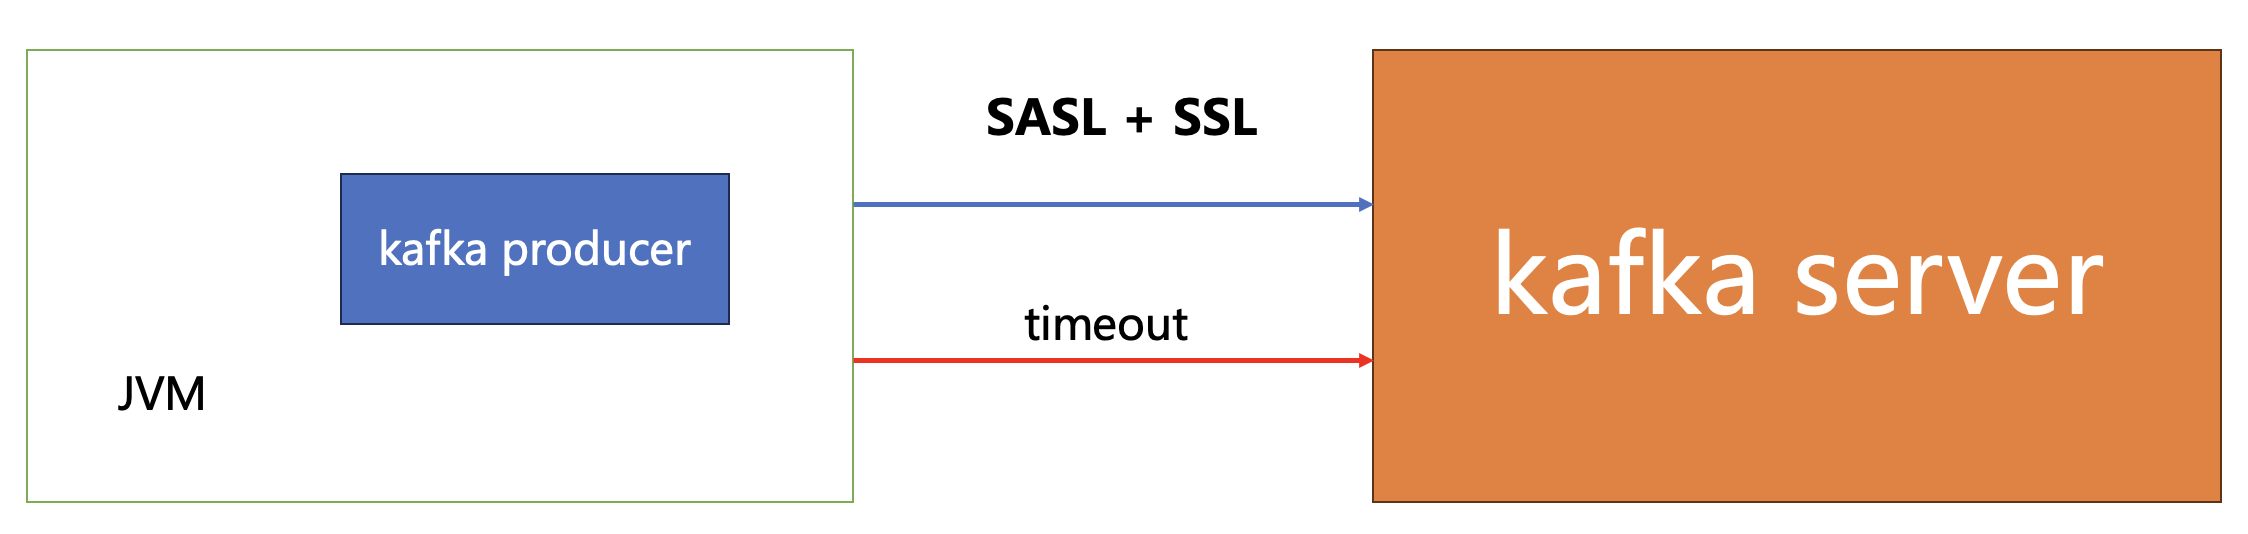
try {
// 这里发出了请求
client.send(request, time.milliseconds());
while (client.active()) {
List<ClientResponse> responses = client.poll(Long.MAX_VALUE, time.milliseconds());
for (ClientResponse response : responses) {
if (response.requestHeader().correlationId() == request.correlationId()) {
if (response.wasDisconnected()) {
throw new IOException("Connection to " + response.destination() + " was disconnected before the response was read");
}
if (response.versionMismatch() != null) {
throw response.versionMismatch();
}
return response;
}
}
}
throw new IOException("Client was shutdown before response was read");
} catch (DisconnectException e) {
if (client.active())
throw e;
else
throw new IOException("Client was shutdown before response was read");

}

这个poll方法,不是简单的poll方法,而在poll方法中会进行超时判断,查看poll方法中调用的handleTimedOutRequests方法

1
2
3
4
5
6
7
8
9
10
11
12
13
14
15
16
17
18
19
20
21
22
23
24
25
26
27
28
29
30
31
32
33
34
@Override
public List<ClientResponse> poll(long timeout, long now) {
ensureActive();

if (!abortedSends.isEmpty()) {
// If there are aborted sends because of unsupported version exceptions or disconnects,
// handle them immediately without waiting for Selector#poll.
List<ClientResponse> responses = new ArrayList<>();
handleAbortedSends(responses);
completeResponses(responses);
return responses;
}

long metadataTimeout = metadataUpdater.maybeUpdate(now);
try {
this.selector.poll(Utils.min(timeout, metadataTimeout, defaultRequestTimeoutMs));
} catch (IOException e) {
log.error("Unexpected error during I/O", e);
}

// process completed actions
long updatedNow = this.time.milliseconds();
List<ClientResponse> responses = new ArrayList<>();
handleCompletedSends(responses, updatedNow);
handleCompletedReceives(responses, updatedNow);
handleDisconnections(responses, updatedNow);
handleConnections();
handleInitiateApiVersionRequests(updatedNow);
// 关键的超时判断
handleTimedOutRequests(responses, updatedNow);
completeResponses(responses);

return responses;
}

由此我们推断,问题可能在于客户端hang住了一段时间,从而导致超时断链。我们通过工具Arthas深入跟踪了Kafka的相关代码,甚至发现一些简单的操作(如A.field)也需要数秒的时间。这进一步确认了我们的猜想:问题可能出在JVM。JVM可能在某个时刻出现问题,导致系统hang住,但这并非由GC引起。

Untitled

为了解决这个问题,我们又检查了监控线程CPU较高的问题。我们发现线程的执行热点是从”sun.management.ThreadImpl”中的”getThreadInfo”方法。

1
2
3
4
5
"metrics-1@746" prio=5 tid=0xf nid=NA runnable
java.lang.Thread.State: RUNNABLE
at sun.management.ThreadImpl.getThreadInfo(Native Method)
at sun.management.ThreadImpl.getThreadInfo(ThreadImpl.java:185)
at sun.management.ThreadImpl.getThreadInfo(ThreadImpl.java:149)

进一步发现,在某些版本的JDK8中,读取线程信息是需要加锁的。

至此,问题的根源已经清晰明了:过高的线程数以及线程监控时JVM全局锁的存在导致了这个问题。您可以使用如下的demo来复现这个问题

1
2
3
4
5
6
7
8
9
10
11
12
13
14
15
16
17
18
19
20
21
22
23
24
25
26
27
28
29
30
31
32
33
34
35
36
37
38
39
40
import java.lang.management.ManagementFactory;
import java.lang.management.ThreadInfo;
import java.lang.management.ThreadMXBean;
import java.util.concurrent.Executors;
import java.util.concurrent.ScheduledExecutorService;
import java.util.concurrent.TimeUnit;

public class ThreadLockSimple {
public static void main(String[] args) {
for (int i = 0; i < 15_000; i++) {
new Thread(new Runnable() {
@Override
public void run() {
try {
Thread.sleep(200_000);
} catch (InterruptedException e) {
throw new RuntimeException(e);
}
}
}).start();
}
ScheduledExecutorService executorService = Executors.newSingleThreadScheduledExecutor();
executorService.scheduleAtFixedRate(new Runnable() {
@Override
public void run() {
System.out.println("take " + " " + System.currentTimeMillis());
}
}, 1, 1, TimeUnit.SECONDS);
ThreadMXBean threadMXBean = ManagementFactory.getThreadMXBean();
ScheduledExecutorService metricsService = Executors.newSingleThreadScheduledExecutor();
metricsService.scheduleAtFixedRate(new Runnable() {
@Override
public void run() {
long start = System.currentTimeMillis();
ThreadInfo[] threadInfoList = threadMXBean.getThreadInfo(threadMXBean.getAllThreadIds());
System.out.println("threads count " + threadInfoList.length + " cost :" + (System.currentTimeMillis() - start));
}
}, 1, 1, TimeUnit.SECONDS);
}
}

为了解决这个问题,我们有以下几个可能的方案:

  • 将不合理的线程数往下降,可能存在线程泄露的场景
  • 升级jdk到jdk11或者jdk17(推荐)
  • 将Thread相关的监控临时关闭

这个问题的解决方案应根据实际情况进行选择,希望对你有所帮助。

我写这篇文章来论证“超时之后要不要重启客户端”、“如何重启客户端”。简而言之,重启客户端还是为了让系统能够达到自愈,是比较高的可靠性要求。如果你的软件没有这么高的可靠性要求,像是人机交互程序等对可靠性要求较低的场景,可以选择不考虑这个功能。毕竟实现这个功能的时间至少够300倍你重新点击按钮/重启的时间了。

如果是一些串口协议,通过传输的间隙来判断报文的间隔,比如modbus协议,3.5个时间内不发送,就计算做一个协议报文的开始,那么故障时的报文毫无疑问会处理失败(因为存在CRC校验,奇偶校验等)。等待故障结束,又3.5个时间后,就会恢复正常。

如果能确保网络通信报文不会遭到篡改、也没有宇宙射线/太阳黑子修改你的比特位的场景下,笔者认为没有特别大的必要对客户端进行重启操作,因为不见得重启后就比之前更好,这种超时通常是由服务端处理时间长导致的。没做到建链限制的情况下,贸然重启,还可能会引起建链的波峰。

但是,在实际复杂的网络环境下,如网络报文遭到篡改部分字节丢失等的情况下,一切就大不一样了,不重启客户端就无法自愈。这其中的关键在于,切分报文是否正确。

比如基于TCP的网络协议,这也是本文重点讨论的场景,假设应用协议采用最常见的LengthBasedFrame分包方式,这种协议,通常根据前0~4个字节来判断协议的总长度,比如前面的字节是00000014,那这个报文长度就是1*16 + 4 = 20长度。这种时候,一旦发生了报文篡改/丢包,会导致通信端计算报文长度出错,一直在傻等,无法自愈。

比如上面的例子一旦发生篡改,将4篡改5,那么就会导致客户端/服务器一直在等待不存在的第21个字节,这种情况下,如果不做超时重建,那么这条链路就会一直处于等待状态,无法自愈。

综上所述,实际复杂的网络环境下出现通信超时,这条链路可能会无法自愈。这种情况下,笔者推荐对针对tcp链路做超时重建,业内的一些例子像是:bookkeeper client没有做,kafka client做了。至于重建的触发条件,比如一次超时就重建、多次超时之后才重建、仅当心跳报文超时才重建,这些就交给读者自己把握了。如果区别不大,笔者倾向于一次超时就重建,逻辑简单清晰。

在Java程序运行时,一些非受检异常可能会导致程序崩溃,比如NullPointerException、ArrayIndexOutOfBoundsException等等,这些异常都是由JVM抛出的,如果不对这些异常进行处理,小则线程运行中突然退出,大则整个程序崩溃。理想的场景下,每一个非受检异常都应该被捕获并进行处理,但是在实际开发中,我们往往会忽略一些异常,这些异常可能是由于程序员的疏忽导致的,也可能是由于程序员无法预知的原因导致的,比如第三方库抛出的异常。

为了避免这些异常导致程序崩溃,Java提供了一个全局的异常处理器,即DefaultUncaughtExceptionHandler,它可以捕获所有未被捕获的异常,从而避免程序崩溃。

DefaultUncaught的使用示例如下:

1
2
3
4
5
public class UncaughtExceptionHandle {
public static void main(String[] args) {
Thread.setDefaultUncaughtExceptionHandler((t, e) -> log.error("Uncaught exception: ", e));
}
}

上述的代码会将未捕获的异常打印到日志中,如果你希望打印至标准输出或标准输出,可以将log替换为:

1
2
3
4
// 标准输出
System.out.println("Uncaught exception: " + e);
// 错误输出
System.err.println("Uncaught exception: " + e);
0%